Saturday morning we woke up in time to get Reegan to swim lessons, except we forgot that it was an off week since it was spring break. Oh well, we were there, swim suits were there, so we had a family swim. The rest of the day we spent picking up, cleaning, Jason painted 2 coats on the trim in what will soon be Reegan's new room, and after nap (Reegan's, not ours unfort) we headed outside to play (again Reegan) and clean out, vacuum, and wash the cars. We were very productive. That night we went to dinner with great friends at Gram and Dunn on the plaza. I recommend it, it was very good. The 6 of us gave it 1 1/2 thumbs up (out of 2 of course)! We decided that we are going to start doing this once a month or so. We'll try a new restaurant, maybe enjoy a cocktail and spend a fun evening together.
It had been a busy few days, so Sunday morning we let Reegan sleep in. We weren't able to make it to Sunday school, but I did make homemade apple cinnamon pancakes and then headed off to church. We went out to lunch with our dinner for 8 group and then off to run errands. I know, how thrilling, chores one day and errands the next! It was nice being so productive and we were all 3 together so it was nice. We ate dinner at home, relaxed a little and when our little one was off to bed, we started in on our project.
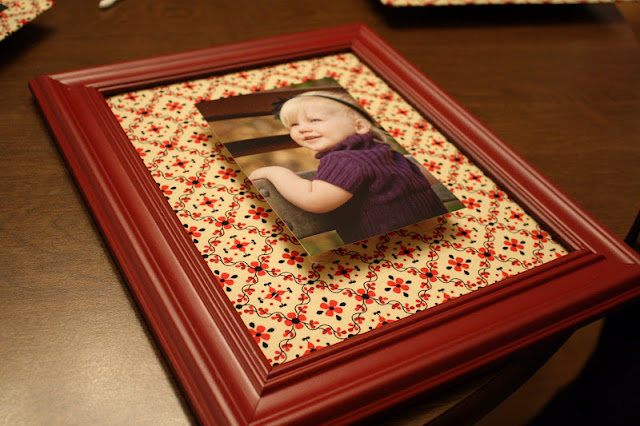
I saw this idea online a while ago, but can't remember where. I adapted it a little and I think it turned out great. I usually dont share things like this, but I thought it turned out so cute that I had to share. I found these cheap picture frames from Walmart ($4) that we wanted to turn red in order to add some color to our living room. Jason did this part, I stayed inside away from the fumes. Before...
After...
You also need some fabric, the coloring is a little weird in this photo, but I love the fabric. I bought a yard and a half so that I made sure to have enough...I had way more than enough. You probably only need 1/2-3/4 yards and that was for 6 8x10 picture frames.
You don't need the glass at all, get rid of it or use it for something else. Cover the backing of the frame and glue it to the backside. Does that make sense???
I used fabric glue, but regular glue is probably fine too. I was looking for wood blocks to put behind the picture to give it some dimension but couldn't find any, so these wooden circles did the trick.
The hardest part was trying to find the pictures we wanted to use. I just used regular 4x6 photos, I wanted something that I could easily (and cheaply) switch out.
Glue the spindles or blocks to the back of the picture to give it some depth.
Glue the other side of the spindles to the back of the frame covered in fabric.
Now put it in the frame.
I wanted to make sure these dried really well and therefore they are still not hanging on our wall. Its tough when Jason and I work opposite schedules. I think we'll post them tonight and I'll try to post a pic once they are on the wall. We think they look super cute, plus they were cheap and easy! Doesn't get any better!
I have a few other projects that I'm currently working on. I love being done with school and having the time to once again do things that I enjoy and don't feel guilty about spending a little bit of money since I'm now contributing financially.
I hope your weekend was just as great!


No comments:
Post a Comment